Showing posts with label headers. Show all posts
Showing posts with label headers. Show all posts
February 23, 2010
Editing A Header (without having to buy some big editing program)
When it comes to creating your own cute blog there are so many websites out there that offer an endless supply of backgrounds for you to choose from. But now that you've got the cute background, what about a header? Suddenly a plain block of text that says your blog's name does not seem adequate, but at the same time you don't want to have to go and buy some photo editing program like Photoshop- so what do you do? Well enter a site I just found called Fotoflexer which is an online photo editing site. There is a really great video tutorial about customizing a header that can be found here at Shabby Blogs. Definitely go and check it out.


February 20, 2010
Creating a Personal Header Using a Photo Editing Program
There are lots of blog backgrounds that you can find online- but unless you want to pay someone to do it- you have to make your own header. Luckily it's not to hard.
You will need a photo editing program of some type such as Photoshop. If you do not have a program already you can download a free program called Gimp. This is a free download that can do a lot of the same things Photoshop does. I have never personally used it but I know there a lot of people who do.
(This tutorial is assuming that you already know how to use your program- if not, you'll have to find another tutorial for that.)
What you need to do is to make a new document that is 700 px wide by about 250 px high. (You can get away with making it taller than that- but this is a good size if you don't want your header to be the only thing people see when they first come to your blog.) Now make your header however you want and then save your document. If you have filled up the entire space with images than you can save it as a .jpeg if however, there are some parts of your header that are transparent (such as mine) you will need to crop it as close to where the image starts as you can and then save it as a .png.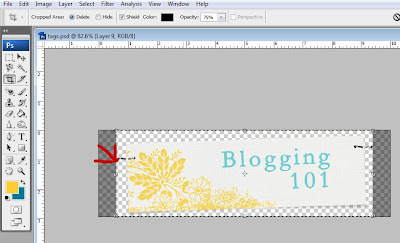 Once you have your image saved go to the "Layout" of you blog and click "edit" on the header. Choose "instead of title and description" and "shrink to fit" and then browse your computer for your image. Hit save and you're done! If it doesn't quite fit right try shrinking your image.
You will need a photo editing program of some type such as Photoshop. If you do not have a program already you can download a free program called Gimp. This is a free download that can do a lot of the same things Photoshop does. I have never personally used it but I know there a lot of people who do.
(This tutorial is assuming that you already know how to use your program- if not, you'll have to find another tutorial for that.)
What you need to do is to make a new document that is 700 px wide by about 250 px high. (You can get away with making it taller than that- but this is a good size if you don't want your header to be the only thing people see when they first come to your blog.) Now make your header however you want and then save your document. If you have filled up the entire space with images than you can save it as a .jpeg if however, there are some parts of your header that are transparent (such as mine) you will need to crop it as close to where the image starts as you can and then save it as a .png.
 Once you have your image saved go to the "Layout" of you blog and click "edit" on the header. Choose "instead of title and description" and "shrink to fit" and then browse your computer for your image. Hit save and you're done! If it doesn't quite fit right try shrinking your image.
Adding Tabs to Your Header
To add tabs underneath your header you are basically just adding pictures with links and then draging them underneath your header.
First you need to upload your images to an online photo hosting account such as PhotoBucket.Next go to your layout and choose to add a gadget- pick the html option.
Paste the following code in the box:
< a href="destination link">< img src="photo direct link"/>< /a>
Put your destination link where the red link is (delete what is there now) and in the purple spot put the link for your photo (with photobucket it is called the DIRECT LINK).
If you have several tabs just paste the code several times right after each other (with no spaces), editing the links for each. Then save your gadget.
Now in your layout window drag that new html gadget until it is directly underneath your header and hit save.
Thanks to my friend Happy for this tip!
First you need to upload your images to an online photo hosting account such as PhotoBucket.Next go to your layout and choose to add a gadget- pick the html option.
Paste the following code in the box:
< a href="destination link">< img src="photo direct link"/>< /a>
Put your destination link where the red link is (delete what is there now) and in the purple spot put the link for your photo (with photobucket it is called the DIRECT LINK).
If you have several tabs just paste the code several times right after each other (with no spaces), editing the links for each. Then save your gadget.
Now in your layout window drag that new html gadget until it is directly underneath your header and hit save.
Thanks to my friend Happy for this tip!
Subscribe to:
Posts (Atom)