There are definitely more and more printing options becoming available every day but here are a few for you to compare.
The first is probably the most common option: Blurb. The big thing Blurb has to offer is that it will "slurp" your blog posts from your blog and put them into a book. You can then go through and edit any pictures or text or choose a different layout for each page. You also have to download their program (it's free)- but you have several different sizes and paper options to choose from.
Another option is Scrapbook Blogger. This company offers a more "scrapbook" style book but you are limited to one size (11"x8.5"). They can also download your posts straight from your blog.
And the last option I have to share now is ScrappingSimply. They use a company called Blog2Print. Again you only have one size to choose from- and they are plain layouts, but you can also download just a PDF version of your blog for $7. This might be the most economical option as you could download the PDF version and print it yourself and have it simply bound at a store like Kinkos.
If you have any other places you have found to print blogs please share in the comments.
February 20, 2010


Creating a Personal Header Using a Photo Editing Program
There are lots of blog backgrounds that you can find online- but unless you want to pay someone to do it- you have to make your own header. Luckily it's not to hard.
You will need a photo editing program of some type such as Photoshop. If you do not have a program already you can download a free program called Gimp. This is a free download that can do a lot of the same things Photoshop does. I have never personally used it but I know there a lot of people who do.
(This tutorial is assuming that you already know how to use your program- if not, you'll have to find another tutorial for that.)
What you need to do is to make a new document that is 700 px wide by about 250 px high. (You can get away with making it taller than that- but this is a good size if you don't want your header to be the only thing people see when they first come to your blog.) Now make your header however you want and then save your document. If you have filled up the entire space with images than you can save it as a .jpeg if however, there are some parts of your header that are transparent (such as mine) you will need to crop it as close to where the image starts as you can and then save it as a .png.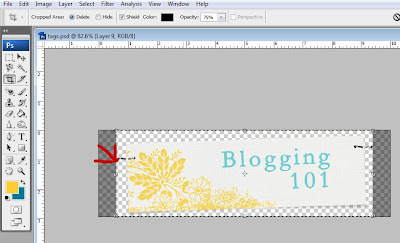 Once you have your image saved go to the "Layout" of you blog and click "edit" on the header. Choose "instead of title and description" and "shrink to fit" and then browse your computer for your image. Hit save and you're done! If it doesn't quite fit right try shrinking your image.
You will need a photo editing program of some type such as Photoshop. If you do not have a program already you can download a free program called Gimp. This is a free download that can do a lot of the same things Photoshop does. I have never personally used it but I know there a lot of people who do.
(This tutorial is assuming that you already know how to use your program- if not, you'll have to find another tutorial for that.)
What you need to do is to make a new document that is 700 px wide by about 250 px high. (You can get away with making it taller than that- but this is a good size if you don't want your header to be the only thing people see when they first come to your blog.) Now make your header however you want and then save your document. If you have filled up the entire space with images than you can save it as a .jpeg if however, there are some parts of your header that are transparent (such as mine) you will need to crop it as close to where the image starts as you can and then save it as a .png.
 Once you have your image saved go to the "Layout" of you blog and click "edit" on the header. Choose "instead of title and description" and "shrink to fit" and then browse your computer for your image. Hit save and you're done! If it doesn't quite fit right try shrinking your image.
Using Custom Colors
One of the problems with Blogger is that the colors you can use can be very limiting- but it's very easy to change that! The first method is to use an html color picker to find html codes for other colors. An html color code consists of 6 different numbers and/or letters. Here are two different charts to find those codes:
http://html-color-codes.com/- On this chart just copy the 6 letters/numbers that are inside the box
http://html-color-codes.info/#Html_Color_Code_Chart- for this chart click on the color you want and the code will show up in the box below. Once you have your color code go into the layout area of your blog and choose Fonts and Colors.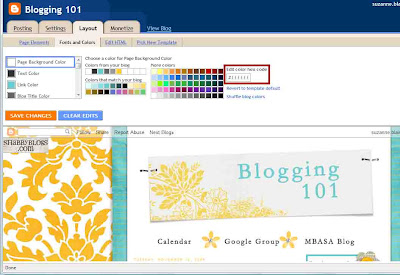 In the box (here outlined in red) enter in that hex code and hit enter. You will notice that as you enter in different colors the box that has colors that match your blog will change- offering colors that are not part of the standard box.
If you would like your colors to match exactly with your header and/or background open your image in an editing program such as Gimp or Photoshop and choose your eye dropper tool. Click on the color you want and then open up the color picker box. In photoshop at the bottom left of your color box click "Web colors only" and then copy the color code and enter it in blogger.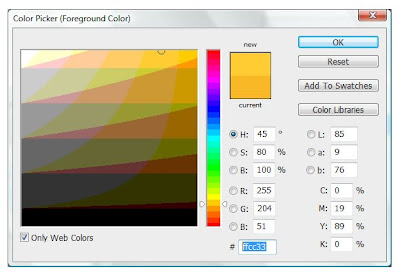
http://html-color-codes.com/- On this chart just copy the 6 letters/numbers that are inside the box
http://html-color-codes.info/#Html_Color_Code_Chart- for this chart click on the color you want and the code will show up in the box below. Once you have your color code go into the layout area of your blog and choose Fonts and Colors.
 In the box (here outlined in red) enter in that hex code and hit enter. You will notice that as you enter in different colors the box that has colors that match your blog will change- offering colors that are not part of the standard box.
If you would like your colors to match exactly with your header and/or background open your image in an editing program such as Gimp or Photoshop and choose your eye dropper tool. Click on the color you want and then open up the color picker box. In photoshop at the bottom left of your color box click "Web colors only" and then copy the color code and enter it in blogger.

Blogging Safety
This site has been created to help you learn some new tips and tricks to personalize your blog. For this first post lets cover some good Internet safety tips:
1. Don't put personal information about yourself or your family members (or friends for that matter) on your blog. Avoid using your last name, home address, and your phone number. Some people refer to their family members such as DH (dear husband) DD (dear daughter) DS (dear son) or name each child with a number (i.e. "#1 said the funniest thing today!")
2. Remember once you post a picture on the internet you have lost any control over it. Even if you remove the picture from your site- someone might have already copied it and posted it somewhere else. Best way to think of it- don't put anything on your blog that you wouldn't want the creepiest person to use however they wanted. (i.e. maybe rethink the potty training pictures) :)
3. Think about someone reading your blog out of context- are you ragging on your husband's company? What if his boss came across it? (My husband's did with mine!) Don't slander or attack anyone.
4. Keep your events private. If you're husbands out of town- don't post about it until after he is back! Don't list where your children are going to be playing soccer etc.
5. Consider making your blog private. Yes it is a pain to have to invite people to read your blog but it gives you much better control over who is reading your blog. But remember it is not completely safe- still follow the above suggestions. There are some pretty smart creepy people out there!
For more tips you can look here.
1. Don't put personal information about yourself or your family members (or friends for that matter) on your blog. Avoid using your last name, home address, and your phone number. Some people refer to their family members such as DH (dear husband) DD (dear daughter) DS (dear son) or name each child with a number (i.e. "#1 said the funniest thing today!")
2. Remember once you post a picture on the internet you have lost any control over it. Even if you remove the picture from your site- someone might have already copied it and posted it somewhere else. Best way to think of it- don't put anything on your blog that you wouldn't want the creepiest person to use however they wanted. (i.e. maybe rethink the potty training pictures) :)
3. Think about someone reading your blog out of context- are you ragging on your husband's company? What if his boss came across it? (My husband's did with mine!) Don't slander or attack anyone.
4. Keep your events private. If you're husbands out of town- don't post about it until after he is back! Don't list where your children are going to be playing soccer etc.
5. Consider making your blog private. Yes it is a pain to have to invite people to read your blog but it gives you much better control over who is reading your blog. But remember it is not completely safe- still follow the above suggestions. There are some pretty smart creepy people out there!
For more tips you can look here.
Adding Tabs to Your Header
To add tabs underneath your header you are basically just adding pictures with links and then draging them underneath your header.
First you need to upload your images to an online photo hosting account such as PhotoBucket.Next go to your layout and choose to add a gadget- pick the html option.
Paste the following code in the box:
< a href="destination link">< img src="photo direct link"/>< /a>
Put your destination link where the red link is (delete what is there now) and in the purple spot put the link for your photo (with photobucket it is called the DIRECT LINK).
If you have several tabs just paste the code several times right after each other (with no spaces), editing the links for each. Then save your gadget.
Now in your layout window drag that new html gadget until it is directly underneath your header and hit save.
Thanks to my friend Happy for this tip!
First you need to upload your images to an online photo hosting account such as PhotoBucket.Next go to your layout and choose to add a gadget- pick the html option.
Paste the following code in the box:
< a href="destination link">< img src="photo direct link"/>< /a>
Put your destination link where the red link is (delete what is there now) and in the purple spot put the link for your photo (with photobucket it is called the DIRECT LINK).
If you have several tabs just paste the code several times right after each other (with no spaces), editing the links for each. Then save your gadget.
Now in your layout window drag that new html gadget until it is directly underneath your header and hit save.
Thanks to my friend Happy for this tip!
Subscribe to:
Posts (Atom)